
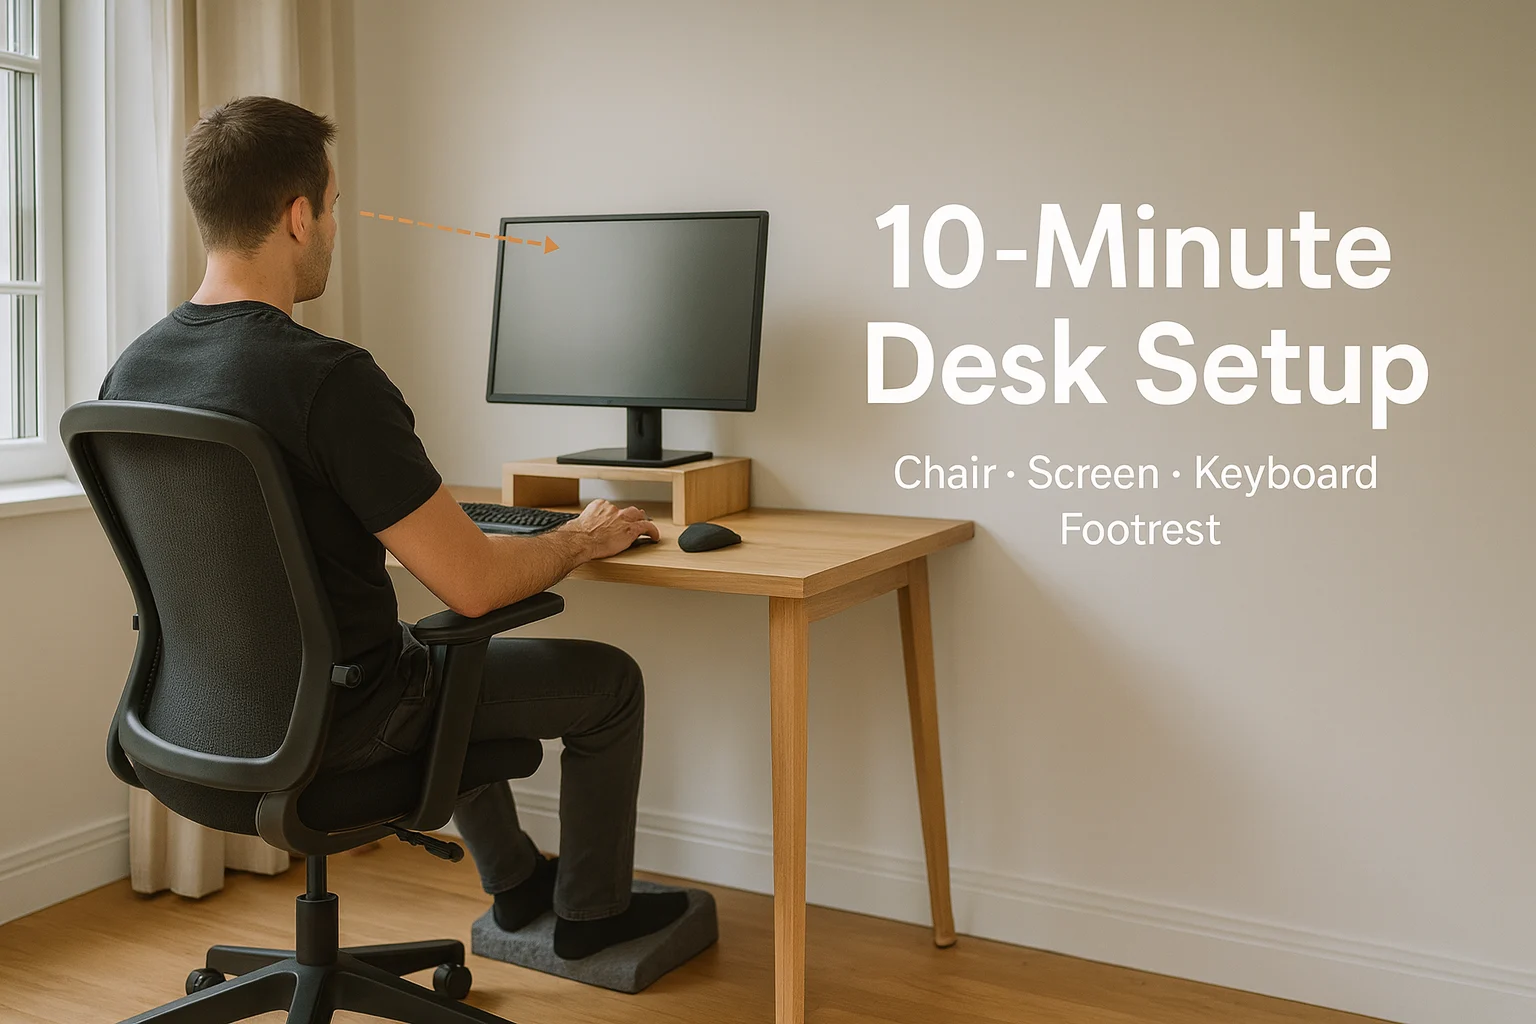
This is your quick, practical setup you can do right now. No fancy gear required—just your existing chair, desk, and a few household items (books = monitor riser, a shoebox = temporary footrest). Bookmark this guide on Comfort Protocol and come back anytime you tweak your space.
Why this matters?
A good desk setup reduces neck/shoulder tension, wrist strain, and end-of-day fatigue. The aim is simple: keep joints in neutral angles, distribute pressure evenly, and line up your eyes, hands, and feet so your body isn’t compensating all day.
Targets to keep in mind
- Elbows: ~90–100° (forearms level or slightly declined)
- Hips: ~100–110° reclined (open hip angle beats a rigid 90°)
- Knees: ~90–105°, feet fully supported
- Wrists: straight/neutral (avoid extension)
- Screen: top of the usable display at or slightly below eye level
- Viewing distance: ~50–75 cm (20–30 in), adjust for vision needs
The 10-Minute Setup (minute-by-minute)
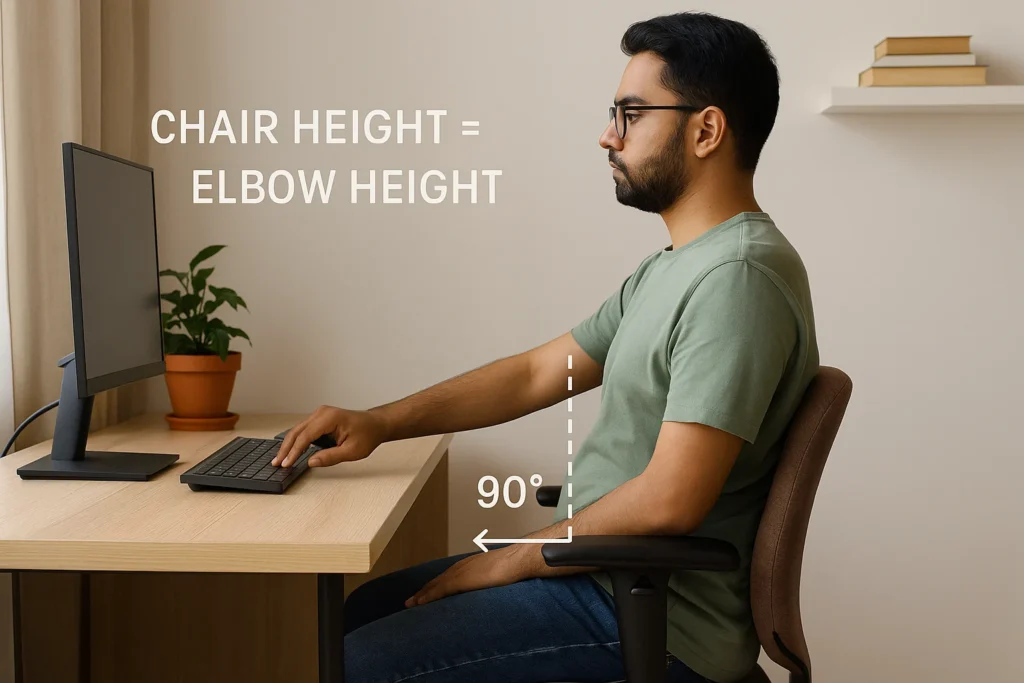
Minute 0–1: Chair height = elbow height
- Sit back in the chair with your hips all the way to the backrest.
- Relax your shoulders. Bend elbows at your natural typing angle.
- Raise/lower the seat so your elbows are level with the desk surface (or your keyboard height if using a tray).
- If your desk is fixed and too high, keep the chair higher and plan a footrest (we’ll set it at Minute 7–8).
Tip: If your shoulders are shrugging to reach the keyboard, the seat is too low or the desk is too high.
Minute 1–2: Seat depth = 2–3 fingers behind knees
Slide your seat pan (or your body) so there is a 2–3 finger gap between the seat edge and the back of your knees.
- If your seat doesn’t slide, scoot back and add a small pillow or folded towel behind your lower back (this shortens effective seat depth).
Minute 2–3: Lumbar support dial-in
Your lower back loves a gentle curve.
- Raise/lower the backrest or add a rolled towel at the belt-line level so you feel contact without pressure.
- Slightly recline the chair to 100–110°. This opens the hips and shares load with the backrest.
Minute 3–4: Armrests (optional but helpful)
- Set armrests just below elbow height so your shoulders don’t hike up.
- Keep them close enough to support forearms without splaying elbows outward.
- If armrests hit the desk, lower them—or remove one side temporarily if it blocks you from getting close.
Minute 4–5: Screen height & distance
- Put the monitor directly in front of you.
- Height: Align the top of the screen at or just below eye level. Bifocals/progressives? Drop the screen a bit more to avoid constant chin tilt.
- Distance: Start at ~50–75 cm (20–30 in). If you lean forward to read, increase font size or move the screen closer—don’t crane your neck.
Laptop users:
- Best: Use a laptop stand + external keyboard/mouse.
- Quick fix: Stack the laptop on books to hit eye level; use an external keyboard/mouse placed at desk height.
Minute 5–6: Keyboard position & tilt
- Center the keyboard with your body (G/H keys aligned with your belly button).
- Keep it close enough that your elbows hang naturally under your shoulders—no reaching.
- Flat or slight negative tilt (front edge higher than back) helps keep wrists neutral. Avoid positive tilt (front lower), which can extend wrists.
Minute 6–7: Mouse alignment & grip
- Place the mouse on the same level and close to the keyboard, shoulder width.
- Keep your wrist neutral; move from the elbow/shoulder, not only the wrist.
- If you pinch the mouse, try a lighter grip and lower pointer speed a bit to reduce micro-tension.
Minute 7–8: Footrest & leg position
- If your feet don’t rest flat (because the chair had to be high for the desk), add a footrest.
- DIY: A sturdy stack of books, shoebox, or yoga block works.
- Knees slightly below or at hip height; avoid pressure under the thighs.
- Allow ankle movement; don’t lock your feet.
Minute 8–9: Lighting & glare
- Face the monitor perpendicular to windows where possible.
- If there’s glare, rotate screen slightly or use a matte screen filter.
- Use a soft front/side light; avoid a harsh downlight that washes the display.
- Set dark mode or increase contrast based on preference—comfort beats rules here.
Minute 9–10: Save your settings + micro-break cue
- Note seat height (marks on cylinder with tape), backrest setting, and monitor height (book stack count).
- Add a timer/reminder for a 20–8–2 rhythm per half-hour:
- 20 min typing focus
- 8 min sit-back/reading or lighter task (change posture)
- 2 min stand/move/stretch eyes and hands
- Blink often; look 20 feet away periodically to ease eye strain.
Quick measurement cheat-sheet (imperial + metric)
- Seat height: When seated, thighs roughly parallel, knees ~90–105°, feet fully supported.
- Desk/keyboard height: Set so elbows 90–100° with relaxed shoulders.
- Monitor height: Top bezel at/below eye level; eyes naturally scan the upper third of the screen.
- Monitor distance: ~20–30 in (50–75 cm)—adjust for vision and text size.
- Chair recline: 100–110°.
- Footrest: Height that restores knee/hip comfort when the chair is raised to meet desk height.
Common mistakes (and easy fixes)
- Perching on the seat edge
- Fix: Slide back to use the backrest; add lumbar support so it “meets you.”
- Shrugging shoulders to reach the keyboard
- Fix: Raise the chair (then add a footrest), or lower the desk/keyboard tray.
- Screen too low (especially on laptops)
- Fix: Raise the screen to eye level; detach keyboard/mouse.
- Wrists bent upward
- Fix: Flatten keyboard or use slight negative tilt; drop the desk/keyboard height a touch.
- Mouse far away
- Fix: Bring it close; consider a compact keyboard to reduce reach.
- Locked posture
- Fix: Shift positions often; use the 20-8-2 rhythm. Your best posture is your next posture.
Special scenarios
If you’re very tall or very short
- Tall: You may need a taller chair and a higher desk (or a desk riser). If desk is fixed and low, lower the chair and accept a slightly more open elbow angle; keep wrists neutral.
- Short: Raise the chair to meet the desk (elbows 90–100°), then footrest is non-negotiable. Consider a compact keyboard to reduce reach.
If you wear bifocals/progressives
- Lower the monitor a bit so you don’t lift your chin to find the focal corridor. Increase text size or adjust zoom to keep the head neutral.
Dual monitors
- Primary centered; secondary at a slight angle. If both equally used, center the bezel split and keep both at matching height/distance.
Standing desks
- Elbows ~90–100°; screen at/below eye level as above.
- Use an anti-fatigue mat and shift weight; alternate sit/stand (e.g., 20–8–2 still applies, just swap one block to standing).
Micro-moves that undo desk tension (2 minutes total)
Do these during the “2” in 20-8-2:
- Neck glides: Gently tuck chin, lengthen the back of the neck, look side-to-side (5 reps).
- Shoulder rolls: Slow rolls forward/back (5 each).
- Wrist openers: Flex/extend gently, shake out hands (10–15 seconds).
- Hip/hamstring reset: Stand, hinge slightly, soften knees, breathe (20–30 seconds).
(Not medical advice. If you have pain or a condition, consult a qualified professional.)
Troubleshooting grid
| Neck stiffness | Screen too low/far | Raise screen; bring it within 50–75 cm |
| Sore shoulders | Desk too high; arms reaching | Raise chair + footrest; pull keyboard/mouse closer |
| Wrist ache | Positive keyboard tilt; desk too high | Flatten/negative tilt; lower typing surface |
| Lower-back fatigue | No lumbar contact; seat too deep | Add lumbar roll; shorten seat depth with cushion |
| Thigh pressure | Seat too high; no foot support | Add footrest or lower chair |
| Eye strain | Glare; tiny fonts | Re-angle screen; increase text size; add soft light |
The 60-second end-of-day reset
Before you shut down:
- Slide chair in; tuck keyboard/mouse neatly so tomorrow you start close to your desk.
- Return screen to your marked height; wipe it clean (clarity reduces squinting)
- Jot a mini-note: What felt tense today? Fix that first tomorrow.
What to upgrade (when you’re ready)
You don’t need to buy gear today—but if you do:
- External keyboard + mouse (for laptop users): #1 ROI for wrist/shoulder comfort.
- Laptop/monitor stand: Any stable riser (even books) is fine; upgrade later for aesthetics.
- Compact keyboard: Reduces mouse reach.
- Footrest: Adjustable beats fixed; DIY works until then.
- Chair: Look for adjustable seat height, backrest height/tilt, and lumbar. Try before buying where possible.
Print-friendly checklist
- Seat height so elbows 90–100° at keyboard
- 2–3 fingers between seat edge & knees
- Lumbar support at belt-line; recline 100–110°
- Keyboard centered; flat/negative tilt
- Mouse close, same height as keyboard
- Feet supported (footrest if needed)
- Top of screen at/below eye level
- Screen distance 50–75 cm
- Glare minimized, soft front/side light
- 20-8-2 rhythm set as a reminder
Internal resources on Comfort Protocol
- Ergonomics Hub – all our desk/posture guides in one place
- Desk Setup Checklist – printable version of the list above
- Laptop-Only Setup Guide – if you can’t add peripherals yet
(If these pages are not live yet, you can create them using the sections above. Keeping the slugs now will help your internal linking later.)
FAQs
Q1: How high should my chair be if my desk is fixed?
Set chair so elbows 90–100° at the keyboard. If your feet lift, add a footrest to remove thigh pressure and restore knee/hip comfort.
Q2: Should my keyboard be tented or flat?
If you type straight-wristed, flat or slight negative tilt is best. If tented boards help your shoulders/wrists, that’s fine—comfort wins.
Q3: Where should my screen be if I wear progressives?
Keep the top of the display slightly below eye level and increase zoom so you can read without chin-lifting.
Q4: Is a standing desk necessary?
No. Alternating postures is the real win. Standers still need good monitor height and arm angles.
Q5: How far should the screen be?
Start at 50–75 cm (20–30 in) and adjust based on font size and your vision—if you lean forward, bring it closer or scale the text.
Conclusion
Small mechanical tweaks beat willpower. In 10 minutes, you’ve aligned elbows, eyes, and feet; relaxed your shoulders; and given your backrest real work to do. Save your settings, set that 20-8-2 reminder, and enjoy the quiet relief of a space that fits you.
Explore more comfort guides and evidence-based tips at Comfort Protocol.
If you’re also looking to improve the overall comfort of your workspace, don’t miss our Air Purifier vs Humidifier: What You Actually Need — a simple guide to choosing the right device for cleaner air and better productivity.